
Seedance 2.0: As low as $0.345 per video
Veo3.1 Lite: As low as $0.0575 per video

Viddo AI is an advanced all-in-one AI video and image generation platform that lets you quickly and easily create stunning videos and images from various inputs. These AI Model powered by Google, OpenAI, Grok AI, ByteDance, Alibaba, Kling, Runway, Vidu, Minimax, Elevenlabs, Midjourney,and so on.
From Raw Clips to Cinematic Stories: A Hands-On Tutorial for AI Short Video Creators
If you've ever stitched together multiple AI-generated video clips only to end up with a jarring, disjointed result — you're not alone. This is the single most common frustration among AI video creators.
Each clip looks great on its own. But the moment you stack them back-to-back, something feels off. The character's position shifts. The lighting changes abruptly. A motion cuts mid-gesture.
The issue isn't the AI model. It's the workflow.
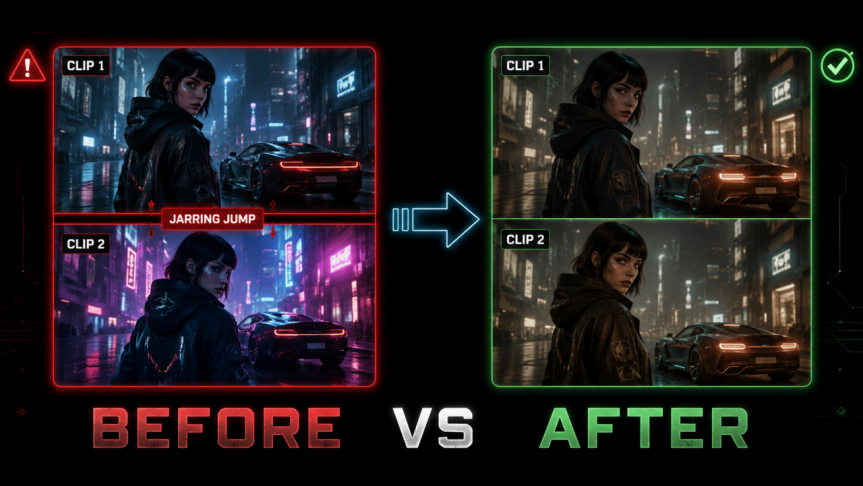
Traditional filmmaking has spent over a century refining the art of shot transitions. Those same principles — continuity editing, match cuts, the 180-degree rule — apply directly to AI video generation. When you learn to think like a director designing each shot's connection point, you unlock truly cohesive AI storytelling.
This tutorial teaches you a three-step method for seamless AI video transitions, covering shot composition shifts, in-motion cuts, and storyboard-driven sequencing. Every technique works with the video generation models available on the Viddo AI platform.
In AI video generation, the first frame is the opening image that determines where the clip begins. The last frame is the final image that determines where it ends.
The essence of first-and-last-frame control is simple: you provide visual anchors for the AI. The biggest source of randomness in AI video generation is the starting and ending state. When you take a screenshot of the last frame from one clip and use it as the first-frame reference for the next, you're essentially telling the AI: "Pick up right here."
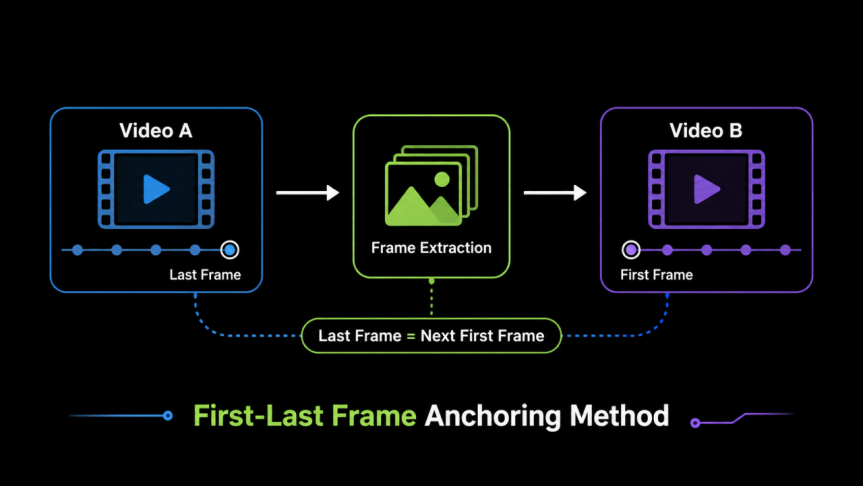
· First frame defines: character identity, scene composition, environment, light direction, color palette, camera position
· Last frame defines: motion trajectory, narrative arc, environmental changes, camera path
|
💡Viddo AI How-To On Viddo AI, you can use the **Image-to-Video** feature by uploading a first-frame reference image to guide generation. The platform integrates Seedance 2.0, Veo 3.1, Kling 3.0, and other models that support first/last-frame control — no need to hop between tools.
Workflow: Viddo AI Homepage → Image to Video → Upload First Frame → Select Model → Enter Prompt → Generate |
This is the most fundamental — and most effective — transition technique. If your edited video looks "off," it's almost certainly because you've placed two similarly composed shots side by side.
Shot scale refers to the framing determined by the camera's distance from the subject:
|
Shot Type |
Abbreviation |
What It Shows |
|
Long Shot |
LS |
The full environment |
|
Full Shot |
FS |
Full body + surroundings |
|
Medium Shot |
MS |
Knees up |
|
Medium Close-Up |
MCU |
Chest up |
|
Close-Up |
CU |
Face or object detail |
The golden rule: If two consecutive shots have similar framing and similar angles, the cut will feel like a jump — a jump cut. In professional filmmaking, this is something editors actively avoid.
|
🎬 Editing Rule of Thumb When choosing between shots, always aim for either a **different shot scale** or a **different angle**. Never place two similarly scaled, similarly angled shots back-to-back. This is the #1 cause of visual "jumpiness" in edited AI videos. |
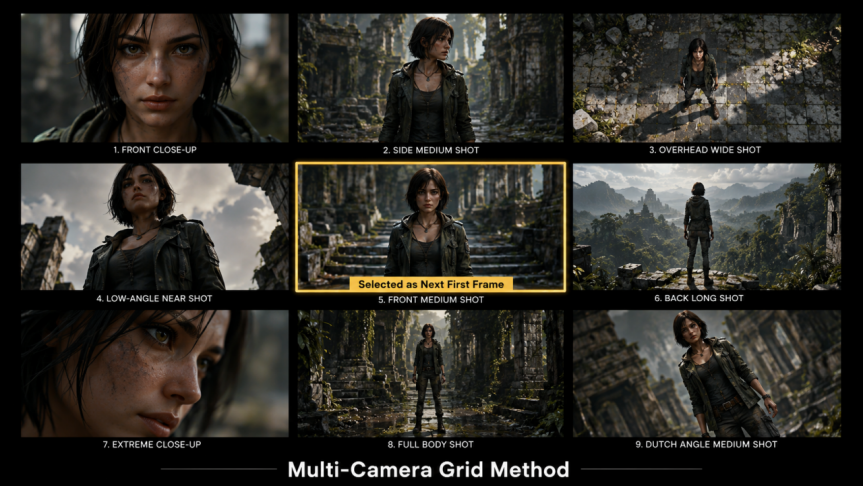
Here's the hands-on workflow:
1. After generating your first clip, capture the last frame (the final screenshot)
2. Upload that frame into an image-to-image generation tool
3. Enter a prompt that requests a different camera angle or shot scale
4. Use the output as the first frame for your next clip
|
💡 Viddo AI How-To Use Viddo AI's **Image-to-Image** feature to create multi-angle variants:
1. Upload your last frame to the Image-to-Image module 2. Choose a model (Seedance 2.0 or Midjourney) 3. Prompt for a different angle or scale variant 4. Select the result with the greatest compositional difference 5. Feed it into Image-to-Video as your next clip's first frame
This "image-to-image + first-frame control" combo is the most commonly used seamless transition workflow on Viddo AI. |
This is an advanced technique — intentionally overlapping the same motion across two clips, making the cut happen during the action rather than between actions.
When your eyes see an image, the visual signal lingers on the retina for roughly 0.1–0.2 seconds. If you switch shots while a character or object is in mid-motion, the brain automatically bridges the trajectory between the two frames. The viewer literally cannot detect the cut point.
This is why action sequences in blockbuster films feel so fluid — directors consistently cut mid-gesture, mid-turn, mid-swing.
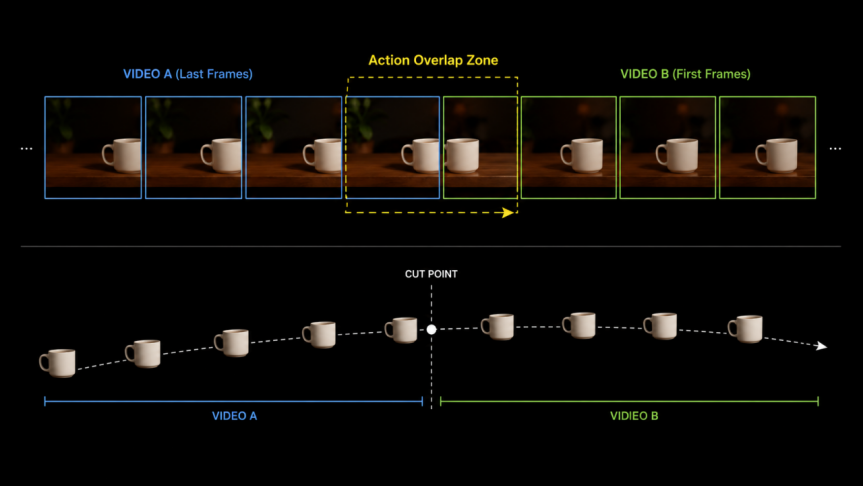
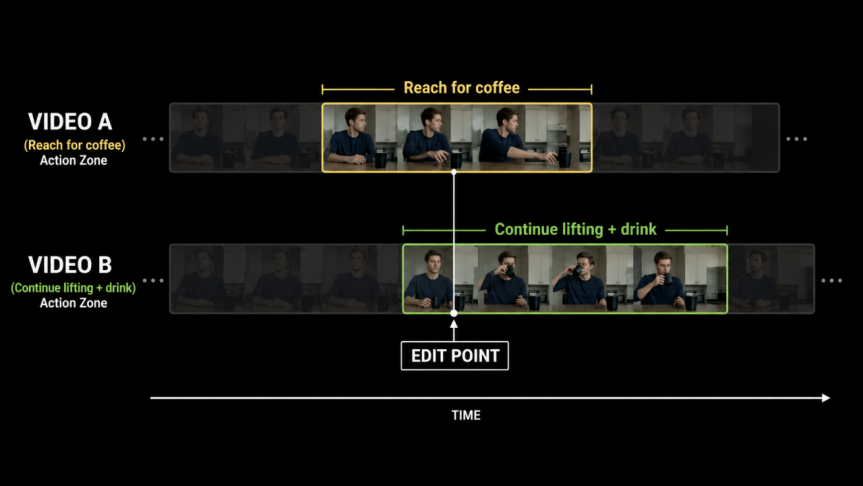
Let's say you're creating a continuous shot of a woman drinking coffee:
1. Find the Motion Midpoint
In your first clip, scrub to the moment where the character is mid-reach for the coffee cup — halfway through the motion. Capture that frame.
2. Generate a Multi-Angle Variant
Feed the captured frame into the multi-camera grid method (Image-to-Image). Select a variant with a significant shift in scale or angle.
3. Use "Continuation" Language in Your Prompt
This is the critical detail — your prompt for the next clip should NOT say "woman starts to pick up coffee." Instead, write: "woman continues lifting the coffee cup, raises it to her lips, and takes a sip."
The keyword is "continues" rather than "starts." You need the motion to overlap between clips.
|
⚠️ Critical Tip The verb you choose in your prompt directly determines whether the motion transitions seamlessly.
❌ "The woman picks up the coffee cup and takes a sip" (this is a new starting action)
✅ "The woman continues lifting the coffee cup to her lips and takes a sip" (this is a continuation of the previous action) |
4. Align the Edit Point
In your editing software, line up the two clips so the motions match. Place the cut point mid-action — even though the footage has switched, the viewer won't notice because the cup is traveling along the same trajectory.
|
💡 Viddo AI How-To Full workflow for in-motion transitions on Viddo AI:
1. Generate Clip 1 with Image-to-Video (e.g., "woman reaches for coffee cup") 2. Download the clip, scrub to the mid-motion keyframe, and screenshot it 3. Upload the screenshot to Image-to-Image for multi-angle variants 4. Select the variant with the biggest scale shift (e.g., medium shot → close-up) 5. Upload to Image-to-Video with a "continues"-based prompt 6. After generating Clip 2, align the motions and place the cut point in your editor |
The real bottleneck in AI long-form video isn't the 15-second clip limit — it's the habit of trying to extend a single clip beyond what the tool can handle. Films were never designed to be one continuous take. They're built by assembling shots into a narrative.
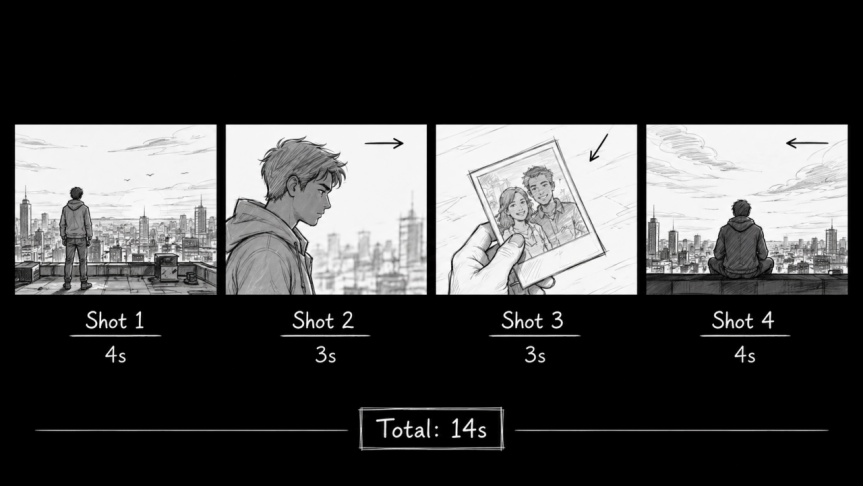
Since AI tools generate 5–15 seconds per clip, design your story at the storyboard stage to break it into self-contained narrative beats. Each clip handles one story beat — easier to generate individually, and far more cinematic when assembled.
|
🎬 Director's Mindset Each clip should cover only one narrative beat. The benefits:
1. **More controllable output** — smaller scope = more predictable AI results 2. **Better character consistency** — less chance of face drift within a single scene 3. **Cinematic pacing** — shot variation is the language of film storytelling |
Feed your script to an AI assistant. Have it break the story into individual shots, each annotated with: scene description, character action, camera movement, estimated duration.
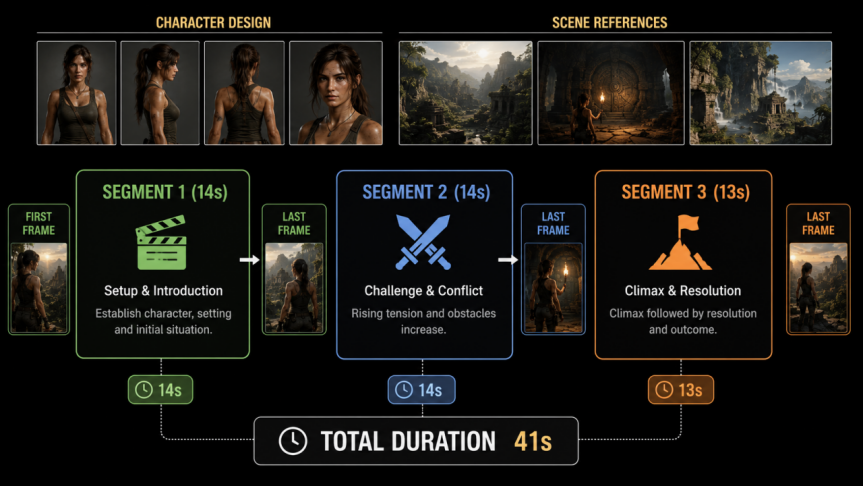
Organize shots into script groups that fit within the time limit:
· Group 1: Shot 1 (4s) + Shot 2 (3s) + Shot 3 (3s) + Shot 4 (4s) = 14s
· Group 2: Shot 5 (5s) + Shot 6 (4s) + Shot 7 (5s) = 14s
· Group 3: Shot 8 (4s) + Shot 9 (5s) + Shot 10 (4s) = 13s
Provide both a character reference sheet and scene reference images to the AI, ensuring the character remains consistent across shots.
Use the first-and-last-frame control method — each clip's last frame becomes the next clip's first frame.
|
💡 Viddo AI How-To Viddo AI's **One-Click Video Creator** supports video generation up to 180 seconds. You can also generate shot-by-shot with Text-to-Video:
1. Enter each storyboard block's description in Text-to-Video 2. Choose a model (Seedance 2.0 or Veo 3.1 recommended) 3. Set aspect ratio (16:9 landscape or 9:16 portrait) 4. Set resolution to 1080p for best quality 5. Download each segment and assemble in your editor
Or use the **One-Click Video Creator** — input the full script and let the AI auto-generate the storyboard and video. |
The human brain is wired to identify the start and end of a motion sequence. You can abbreviate or skip the middle, but the boundaries must be explicit:
· A motion with a start but no end leaves the brain in an unresolved state — it feels "cut off"
· A motion with an end but no start creates a jarring snap into the action
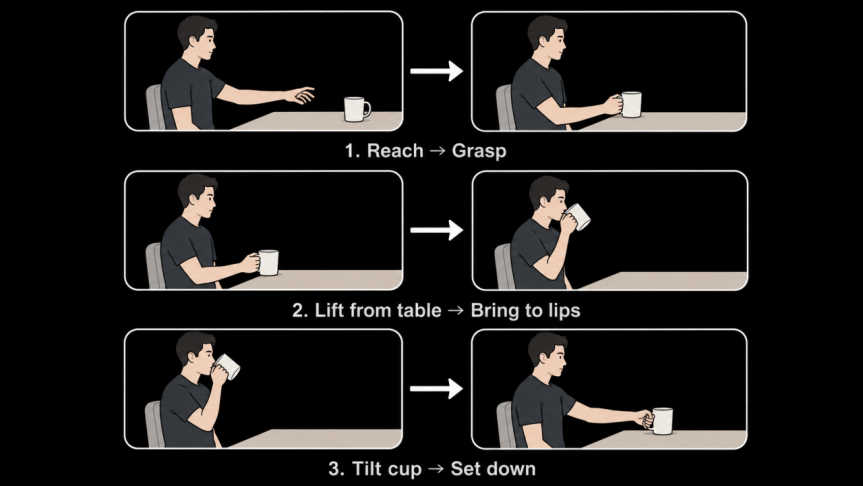
Using the coffee example, a complete motion breaks down into three phases:
1. Reach for the cup: Start = hand extends, End = fingers grip the handle
2. Lift it: Start = cup separates from table, End = cup reaches lip level
3. Take a sip: Start = cup tilts / head tilts back, End = cup pulls away from mouth
If the motion in Clip A is fast and the motion in Clip B starts slow, the viewer will feel the disconnect — even if everything else lines up. This is a momentum mismatch.
The rule: Maintain consistent motion speed across consecutive shots. If a character whips around in Clip A, the opening of Clip B should also be brisk — not a sudden shift into slow motion.
When a motion simply can't be matched across two clips, don't force it. Use these workarounds:
· Reaction shots: Cut to another character's expression to bridge the gap
· Sound effects: A clinking cup sound tells the audience "the cup was picked up" — audio bridges what the visuals can't
· Dialogue-driven pacing: Shift the narrative weight from action to conversation, reducing reliance on motion continuity
|
💡Viddo AI How-To Viddo AI integrates **ElevenLabs** for voice synthesis and **Suno AI** for music generation — complete the entire audio-visual workflow in one place:
- Generate multilingual voiceover with ElevenLabs to drive narrative through dialogue - Create background music and sound effects with Suno to mask minor visual imperfections - Complete the full pipeline from video generation to audio overlay without leaving the platform |
Here's the complete seamless AI video workflow, consolidating everything above:
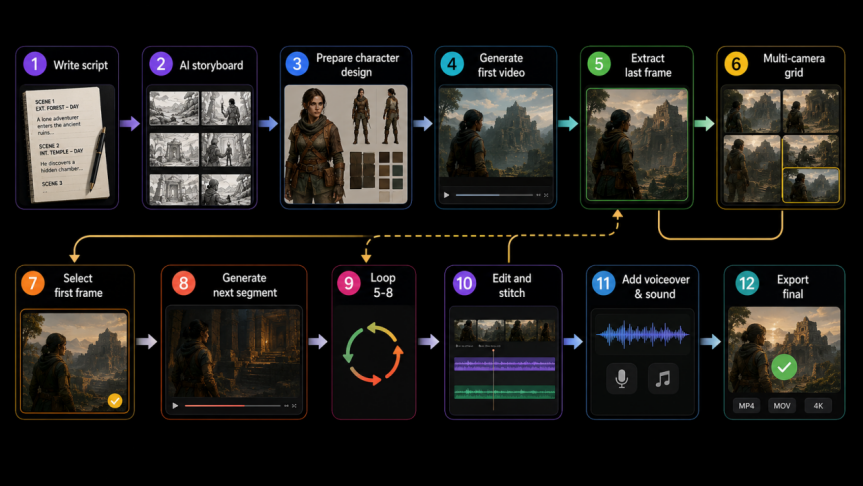
Use AI to draft your script. Define each shot's content and camera work. Keep each clip to 5–15 seconds; aim for 4–5 seconds per individual shot.
Use a text-to-image tool to create multi-angle references for your main character (front, side, back). These serve as the visual anchor for every subsequent clip.
Use Image-to-Video, feeding one of the character reference angles as the first frame.
Screenshot the last frame, run it through Image-to-Image to generate angle/scale variants, and pick the one with the biggest compositional shift as the next clip's first frame.
Use the selected first frame with a "continuation"-based prompt to generate the next segment.
Loop: last-frame capture → multi-angle variant → first-frame selection → clip generation. Continue until all storyboard segments are complete.
Import all clips into your editing software. Arrange them per the storyboard. Place cut points at in-motion transition positions. Add transitions, voiceover, and sound effects.
|
💡 Viddo AI How-To The complete Viddo AI creation pipeline:
1. **Text-to-Image:** Generate character reference sheets and scene images 2. **Image-to-Video:** Generate individual video clips 3. **Image-to-Image:** Create multi-angle variants for first-frame switching 4. **Video Extend:** Continue or lengthen key segments as needed 5. **ElevenLabs:** Generate voiceover 6. **Suno:** Generate background music and sound effects 7. **External editor:** Final assembly and export
Viddo AI covers the entire chain from concept to final cut — no platform-hopping required. |
|
Problem |
Cause |
Solution |
|
Character "face swaps" between clips |
First-frame reference too imprecise or reference strength too low |
Use a high-quality character reference sheet; set reference strength to 70–80% in supported tools |
|
Visible lighting jump at the cut point |
Light source direction inconsistent between clips |
Specify light direction in your prompt (e.g., "natural light from upper left at 45°"); anchor lighting state with the last frame |
|
Motion looks "broken" or cut short |
Cut was placed on a static frame instead of mid-motion |
Ensure the edit point falls during the action, not after the motion has settled |
|
Background changes unexpectedly |
Scene descriptions inconsistent between prompts |
Keep scene descriptions identical across prompts; use the same scene reference image |
|
Total video length too short |
Each clip maxed out but not enough shots |
Add more storyboard shots; shorten individual shot durations; use Video Extend for critical segments |
|
AI generates unwanted motion |
Prompt too vague |
Use more specific prompts; add negative prompts to exclude unwanted movements |
|
Pacing feels flat |
All shots are the same length |
Mimic cinematic rhythm: important shots linger, transitions are snappy — create a long-short-long-short cadence |
Master seamless AI video transitions in three core skills:
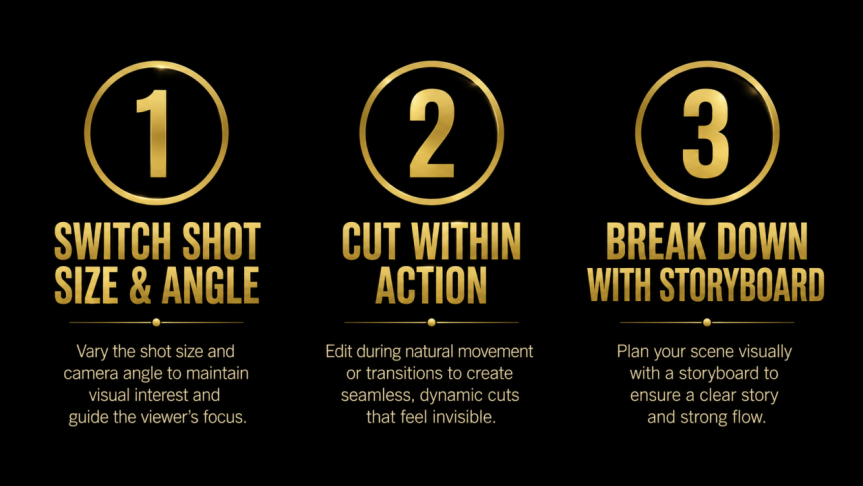
· Understand first-and-last-frame control — capture last frame → generate multi-angle variant → select first frame
· Learn the multi-camera grid method — never place two similar shots side by side; always shift scale or angle
· Master in-motion cuts — leverage persistence of vision to hide transition points mid-action
· Think in storyboards — break your script into segments of ≤15 seconds each
· Maintain motion completeness — every action needs a clear start and end
· Check speed matching — keep motion tempo consistent across consecutive shots
· Use cutaways and sound design — reaction shots and audio bridge gaps that visuals can't
· Use Viddo AI's integrated workflow — from script to final cut without platform-hopping
The bottom line: The real ceiling on AI long-form video isn't any tool's time limit — it's your shot design thinking. Films were never one continuous take. They're built by assembling shots into stories. When you learn to think like a director designing each shot's connection point, you'll be creating your own AI films.
Ready to try it? Start creating on Viddo AI